How to Clean a Robot Vacuum Brush
 By maiagent.online Editorial Team · Updated October 10, 2026
How we research: this guide is based on manufacturer specifications, published data and verified customer feedback. Products are not personally tested unless marked “Tested by us”. Our process.
We may earn a commission when you buy through links on this site, at no extra cost to you. As an Amazon Associate I earn from qualifying purchases.
If your robot vacuum is leaving crumbs behind, making a rubbing noise, or showing hair wrapped around the roller, the fix is usually simple: power it off, remove the brush assembly, clear the tangles, and clean the end caps before putting everything back.
This guide shows the safest order to do that without damaging bearings, sensors, or washable parts. If you're comparing robots for easier upkeep, our robot vacuum buying guide and robot vacuum calculator can help you narrow the right features.
Homes with pets or long hair often need brush cleanup more often, so it also helps to think about brush design before you buy a new machine. If that sounds like your situation, see best robot vacuum for pet hair.
Comparison table
| Brush part | What usually gets trapped | How to clean it | Watch out for |
|---|---|---|---|
| Main roller / dual rollers | Hair, string, carpet fuzz | Remove the roller, cut tangles from the ends, and wipe the channel and end caps | Keep left and right rollers in the same position if your model uses two |
| Bristle brush | Wrapped hair and lint | Snip and pull debris out carefully | Don't bend or fray the bristles |
| Side brush | Long hairs at the hub | Pop it off if it is removable, clear the center post, and wipe the mount | Replace it if the bristles stay bent |
| Brush housing | Packed dust and grit | Vacuum or wipe the compartment dry | Avoid liquid near the motor and sensors |
What you need before you start
The safest robot vacuum brush cleaning is mostly a dry cleanup. Gather small scissors, a dry microfiber cloth, and a trash bin. If your model uses screws or clips, keep them together so reassembly is easier.
Before opening anything, remove the robot from the dock and power it off. For broader maintenance help beyond the brush, you can also browse our Cleaning Guides.
- Small scissors for cutting wrapped hair
- A dry microfiber cloth for the housing and end caps
- The owner’s manual or app, if your model has special brush parts
- A small container for screws, clips, or removable caps
Step-by-step: clean the main brush
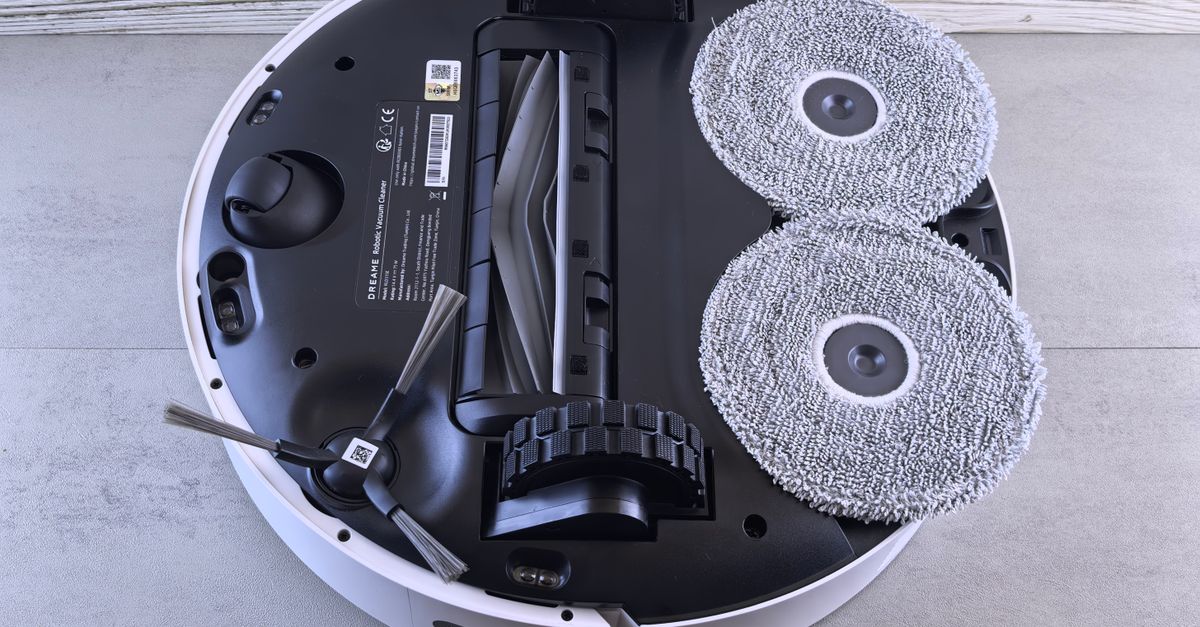
Start with the main brush or roller assembly, since that is where most tangles collect. Work slowly and keep track of every part as you remove it.
If your robot has two rollers, note which one sits on the left and which one sits on the right before you lift them out. Some models use parts that are not interchangeable.
1. Power off and flip the robot over
Remove the robot from the dock, switch it off, and turn it over on a clean surface. If the dustbin blocks access to the brush cover, remove the bin first so you can reach the latch or screws cleanly.
2. Remove the brush cover and lift out the roller
Open the brush cover according to your manual. Lift the roller straight out so you can see both end caps, the axle, and the brush channel underneath. If the cover resists, do not force it; some models use clips that need to be released in a specific order.
- Keep the end caps and any spacers in order
- Take a quick mental note of how the roller sits before you remove it
- If your model has two rollers, keep track of their original positions
3. Cut and pull away tangled hair
Use the scissors to cut long wrapped hair into smaller sections, then pull it away from the roller in short pieces. Work from the ends inward, because that is where hair usually locks around the bearing or axle.
Be careful not to nick the bristles or score the rubber surface. The goal is to free the brush, not shave it down.
- Cut only the wrapped hair, not the brush material
- Free the outer ends first so the roller can spin again
- If a strand is tight around the axle, snip near the end and pull gently
4. Clean the end caps and brush channel
Hair often hides where the roller sits in the housing, so don’t stop when the visible wrap is gone. Wipe the end caps, the axle slots, and the brush well with a dry cloth. If your manual says the end caps are removable or washable, clean them separately and let them dry completely before reinstalling.
This is also a good time to inspect the roller ends. If one side feels rough, the cap may still have debris trapped in it.
- Wipe the end caps and bearing area
- Clear dust from the brush channel
- Do not soak any part unless the manufacturer says it is washable
5. Reinstall and check the spin
Put the roller back in its original orientation and close the cover. Before sending the robot out, spin the brush by hand to make sure it moves freely and does not rub against the housing.
If it still sounds scratchy or stalls when you turn it, remove it again and check for a hair thread, a mis-seated end cap, or a bent brush guard.
- Make sure the roller sits flat in its slots
- Confirm the cover latches fully
- Test for smooth spin before the next cleaning run
Clean the side brush and nearby openings
The side brush can collect hair at the hub even when the main brush looks clean. If the brush pops off easily, remove it, clear the wrapped hair from the center post, and wipe the mount dry. Replace the side brush if the bristles stay bent, split, or warped.
While you’re there, wipe dust from the brush housing and check the nearby openings for lint. If your robot spends a lot of time around pet hair, choosing a brush design that sheds hair more easily can save time later; see best robot vacuum for pet hair.
- Clean the side brush hub and mount
- Wipe dust from the brush opening
- Leave sensors dry and untouched
- Do not spray cleaner into vents, cliff sensors, or wheel wells
What not to do
A brush cleanup goes wrong when liquid, force, or the wrong parts get involved. Keep the job dry unless your owner’s manual specifically approves washing a part.
If you are not sure whether a component is washable, treat it as non-washable until you confirm it in the manual.
- Don’t soak the brush, bearings, or motor housing
- Don’t use harsh chemicals, bleach, or oils unless the manufacturer specifically says to
- Don’t reinstall damp parts
- Don’t mix up left and right rollers if your model uses both
- Don’t clean the filter the same way as the brush; many filters are not washable
How often to clean it and when to replace parts
The right schedule depends on hair, rugs, and pet shedding. If the roller looks fuzzy or the robot starts sounding strained, check it sooner rather than later. A quick visual inspection after heavy use is usually enough to catch problems before they affect pickup.
If you want less brush babysitting in the future, look for easy-access brush covers and anti-tangle rollers when you shop. Our robot vacuum buying guide explains which maintenance features are worth paying attention to.
- Visible tangles around the ends or axle
- Squeaking, clicking, or rubbing sounds
- Missed debris even though the bin is not full
- Brush stalls or error messages from the robot
- Bristles that stay bent, frayed, or permanently flattened
When replacement makes more sense than cleaning
Replace the brush or side brush if the bristles are worn down, the roller is cracked, or the end caps no longer spin smoothly. Cleaning can remove buildup, but it cannot fix damaged plastic or worn bearings.
If your robot uses replaceable rollers, keep the part numbers handy so you can reorder the exact style your model needs.
- Cracked roller body
- Loose or noisy end caps
- Bent side brush arms that will not spring back
- Visible wear that keeps the brush from spinning evenly
FAQ
Can I wash a robot vacuum brush with water?
Only if your owner’s manual specifically says the brush or end caps are washable. If the manual does not say that, keep the brush dry and wipe it clean instead. Water near the bearings or motor housing can cause problems.
How do I get hair out of the ends of the brush?
Cut the wrapped hair near the roller edge, then pull it away in small sections. Hair often hides in the end caps, so check both sides even if the middle of the brush looks clean.
Do I need to clean the side brush too?
Yes. The side brush can collect long hair at the hub even when the main roller looks fine. If the bristles stay bent or split, it is usually better to replace the side brush than to keep trying to reshape it.
Why does my robot vacuum brush squeak after cleaning?
The roller is often misaligned, the end cap is not seated correctly, or a strand of hair is still trapped in the bearing area. Remove the roller again, check the orientation, and make sure it spins freely before reinstalling it.
Should I clean the filter at the same time as the brush?
You can inspect the filter, but do not wash it unless it is marked washable. The brush and filter need different care, and many filters are meant to be tapped out or replaced rather than rinsed.
What if my robot has two main rollers?
Keep each roller in its original left or right position unless the manual says they are interchangeable. Some models use parts that look similar but are meant for a specific side.
The bottom line
The safest way to clean a robot vacuum brush is simple: power off the robot, remove the roller, cut away the hair, clean the end caps and housing, and reinstall everything dry. That routine prevents most brush problems without risking the motor or sensors.
If brush cleanup is becoming a constant chore, focus on anti-tangle rollers, tool-free access, and easy replacement parts when you shop. For a broader compare-and-choose approach, start with our robot vacuum buying guide.
Reader experiences
Own one of these? Your experience helps other readers decide.